

1993-1996 Probe service manuals do not provide a clear procedure for adjusting
the front door glass for windnoise, water leaks, window stutter/jumping and door
closure. This document is based upon a Ford TSB.
There is a very simple solution to frame-less window noise problems, which stem
from the window/door not sealing properly on closure. The simple solution is to
automatically drop the window 1/2" on the door handle-trigger on opening and
raise the window that 1/2" after closing the door. Technology is useless without
initiative.
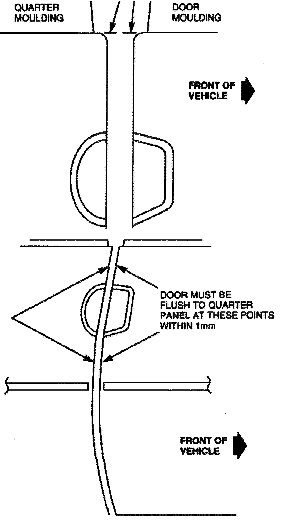
Check the door & striker for correct adjustment (door height must be level
with quarter panel at the top of the door, and the door must be flush with the
quarter panel within 1mm at points above the door handle & middle of the door
(figure below). Only remove the door panel if adjustments need to be made. Do
not remove the door glass, and especially do not remove the door glass guide
brackets from the glass which are not adjustable and are very difficult to
reinstall properly.
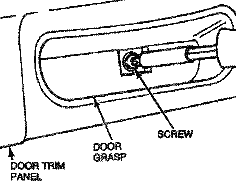
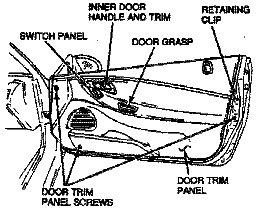
Remove side view mirror inside cover. Remove the door grasp screw, fig below,
(1993-94 years).
Contrary to the TSB, do not remove the door handle as it may breaks.
Remove the 3 remaining door trim panel screws and 1 retaining clip, fig below,
(1993-94 years).
Carefully pull the door trim panel away from the door to disengage the clips.
Guide the inner door handle trim through the door trim panel. Remove the door
trim panel.
Door Trim Panel Installation
This is the reverse of the above, with the the door clips replaced
to prevent door panel squeaks/rattles.
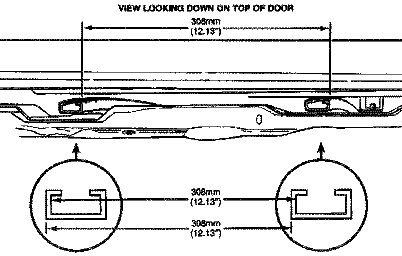
3. Check door glass pitch adjustment
Check the clearance between the quarter glass and door glass along the B-pillar,
the correct gap should be 9-13mm. If adjustment is needed, mark and loosen the
top regulator and guide 14mm nuts - for power windows loosen the 3 power
regulator 10mm bolts and reposition the door glass (fig below).
Torque the regulator nut to 14-18lb/ft (for power windows, the power regulator
bolts to 62-80lb/INCH or 7-9 N-m. Note the units). Check the door glass
pitch adjustment by measuring from the front edge of the regulator channel to
the front edge of the glass guide channel (fig below). The distance should be
308mm. To correct, loosen the front glass guide and adjust.
Tighten the glass guide channel and recheck the distance. Check lower regulator
& guide 12mm nuts for correct torque - 14-18lb/ft. Recheck the quarter glass
to door glass gap.
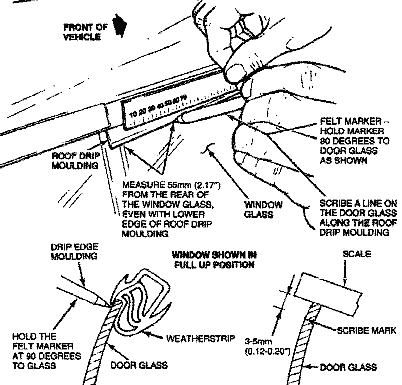
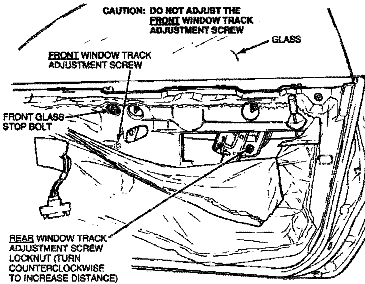
4. Check the door glass rear height adjustment. Adjust if necessary.
With the door glass fully-up and door closed, draw a line along the top of the glass
with a felt market. Locate the line 55mm from the rear of the glass even with the lower
edge of the roof drip moulding (fig below). The mark must be 3-5mm from the glass top edge.
If adjustment is needed, lower the glass 1" and make a reference mark on the door
as per the figure below.
Loosen the glass stop bolt only enough to slide the stop the same distance the
mark is out of specification - eg, if glass is 2mm too high, lower the stop 2mm. Do
not allow the stopper to rotate - as it can change the glass height. Tighten the
glass stop bolt. Raise the door glass and recheck.
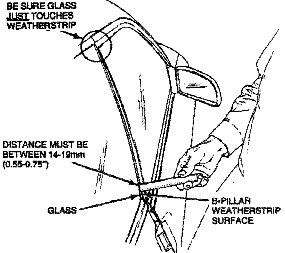
5. Check the door glass rear inboard and outboard adjustment. Adjust if necessary.
It is important that the inboard/outboard adjustment screw is not adjusted.
With the door glass fully-up, close the door until the top rear corner of the glass
lightly touches the weatherstrip (as figure below).
Meaure the distance between the B-pillar weatherstrip surface and the outside of the
glass (fig as above). It must be between 14-19mm. To adjust, loosen the adjustment
screw locknut (fig as below) and turn the adjustment screw counterclockwise to
increase the distance.
Tighten the adjustment screw locknut. Recheck the distance between the B-pillar
weatherstrip surface and the glass outside.
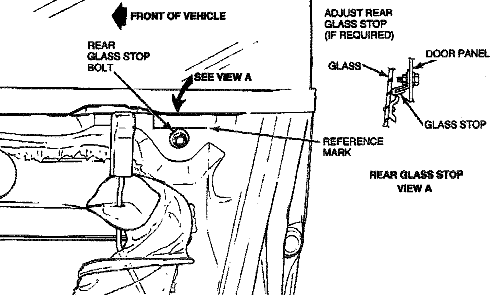
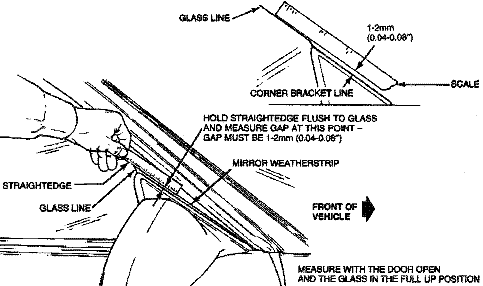
6. Check the door glass front height adjustment & adjust if needed.
With the door closed, check to see if the top edge of the mirror bracket is under
the weatherstrip lip. If adjustment is needed, loosen the 3x 10mm mirror bracket
bolts (previous figure) and move the mirror bracket rearward and down as necessary.
With the glass fully-up place a straightedge on the glass as below.
Measure the gap between the straightedge and the top of the mirror weatherstrip.
The gap must be 1-2mm. If adjustment is required, lower the window 1". Loosen
the front glass stop bolt (figure above that above) and move the stop enough to
get the 1-2mm gap (figure above). Tighten the glass stop bolt. Raise the window
and recheck.
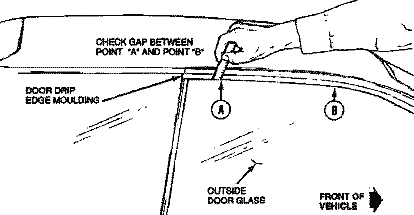
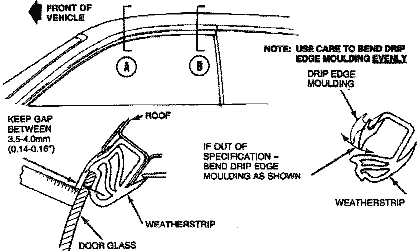
7. Check the drip edge moulding-to-door glass gap. Adjust if needed (1993 models only).
Measure the gap between the door drip edge moulding and the outside glass surface along
the horizontal areas of the top of the glass (next two figures, points A through B). The
gap should be 3.5-4.0mm.
Use your hands to adjust the drip edge moulding by applying pressure to bend the
moulding to provide the required gap. Use caution to bend the drip edge moulding evenly
otherwise it may appear wavy.
8. Check weatherstrip for deformation at top corner of
B-pillar. If the weatherstrip is dimpled inward perform the following steps:
At the top of B-pillar, measure from the bottom edge of drip moulding down 51mm. Mark
the quarter glass (figure as below).
Remove the top half of the weatherstrip from the B-pillar. Remove the top weatherstrip
retaining pin from the weatherstrip and discard the pin. Seal the top weatherstrip
retaining pin hole in the B-pillar.
9 Road test vehicle at highway speeds and perform steps 9a and 9b to verify repair.
Turn blower motor on at various speeds and listen for air leaks. Cycle door glass down and
up to verify the door glass reseals.
Parts required:
Last Upload: 31st January, 2002. V1.50a
Probe window weathershield strip - noise/closure/leaks (all)
 Pre-Emptive - Simple adjustmentThe problem
Front doors - glass closure at top of drip rail, leaks, wind noise, adjustment.
The solution
The specifications vary because door fitment varies - it may be necessary to
change the door glass adjustments to the high or low end of the specifications
to correct the problem on a particular vehicle.
1. Front door glass adjustment procedure
2. Door Panel Removal & Installation
If fitted, remove the window regulator handle. If fitted and you need to later, disconnect
the switch panel electrical connectors. Note the switch panel plastic tabs are very
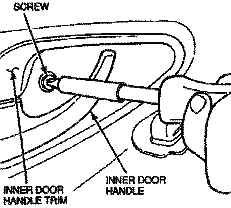
fragile and the unit is expensive. Remove the inner door handle trim screw, fig below, (1993-94 years).

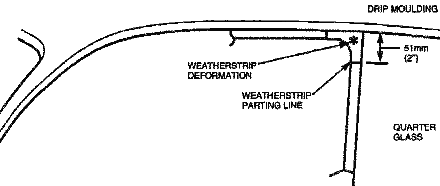
Grab the weatherstrip in front of the corner and pull the weatherstrip rearward around
the radius and down the B-pillar until the parting line on the weatherstrip lines up
with the 51mm mark on the quarter glass. Reseat the remaining portion of the weatherstrip
into the B-pillar. Evenly distribute the weatherstrip slack down the entire length of the
B-pillar.
- Front Door Panel Fastener (3 required)
- Bottom/Rear Door Panel Fastener (4 required)
URL: http://homepage.ntlworld.com/dorothy.bradbury/probemx/p_p13.htm